BASIC COURSE
This Basic Course will provide essential information needed to
satisfactorily operate the TR-606 Drumatix. For complete information
and more complex applications, refer to the
Advanced Course Manual.
Basic Connections
Output
to guitar amp/to audio amp [or just send it straight into your mixer
or multitrack - ed]
Headphone jack
to headphones
AC Adaptor jack
Please connect a Boss ACA Battery Eliminator to this socket.
Do not connect any other brand of Battery Eliminator as this could
damage the internal circuitry of the TR-606.
Caution
It should be noted that when using the TR-606 by itself (without
interfacing with other units using the SYNC connection), the SYNC
INPUT/OUTPUT switch on the back panel should be set to the OUTPUT
position. The TR-606 will not operate with this switch at the INPUT
position.
Choosing Amplification
The TR-606 Rhythm Composer may be monitored through any conventional
amplification, but ideal amplification will reproduce its realistic
drum sounds faithfully with a minimum of added distortion and
coloration.
Audio OUTPUT
The OUTPUT jack on the back panel of the TR-606 presents the summed
output of the individual INSTRUMENT MIX LEVEL (E) controls as adjusted
by the master VOLUME (A) control to allow very precise control over the
TR-606 final output level and balance.
HEADPHONE Jack
The TR-606 also provides self-contained amplification for any
conventional stereo headphones through a 1/4 inch phone jack on the
back panel. The HEADPHONE OUTPUT level is controlled by the master
VOLUME control (A) in combination with the individual INSTRUMENT MIX
LEVEL (E) controls.
Battery Eliminator
The TR-606 is fully portable, normally relying on batteries for all
internal functions and to power the self-contained Headphone amplifier.
To extend battery life, merely connect a BOSS ACA Battery Eliminator to
this socket.
"CAUTION" Don't connect any other brand of Battery Eliminator, as this
could damage the internal circuitry of the TR-606. [Actually, any 9V DC
adaptor with center negative providing 150mA of current will work - ed]
CAUTIONS
-
When the TR-606 is not in use for long periods, remove the battery
to prevent leakage.
-
If battery voltage drops, effect becomes inferior or no sound is
produced. To prevent that, replace the batteries.
-
Be sure to keep the batteries securely connected, even while using
the AC Adaptor.
* Even if AC Adaptor cord comes out during performance, if the
batteries are connected, the TR-606 will continue to operate.
-
If this unit is not to be used for long periods of time, be sure
to switch the power off and remove the exhausted batteries, or
various troubles may be caused by battery leakage.
Memory Back-Up
The TR-606 Rhythm Composer features a non-volatile memory which will
retain Rhythm Patterns and Track compositions when switched 'OFF' and
disconnected from any external power source. The TR-606 relies on
batteries for it's back-up circuit to protect these memories. Always
replace the TR-606's batteries with a complete set of fresh batteries
when the RUN/BATTERY Indicator LED (G) either flashes or fails to
illuminate during the normal Run condition of the TR-606. If the
batteries are changed quickly, within one minute, the memory can retain
the DATA. [Check out battery.txt for
more information on this - ed]
Front and Back Panel Layout
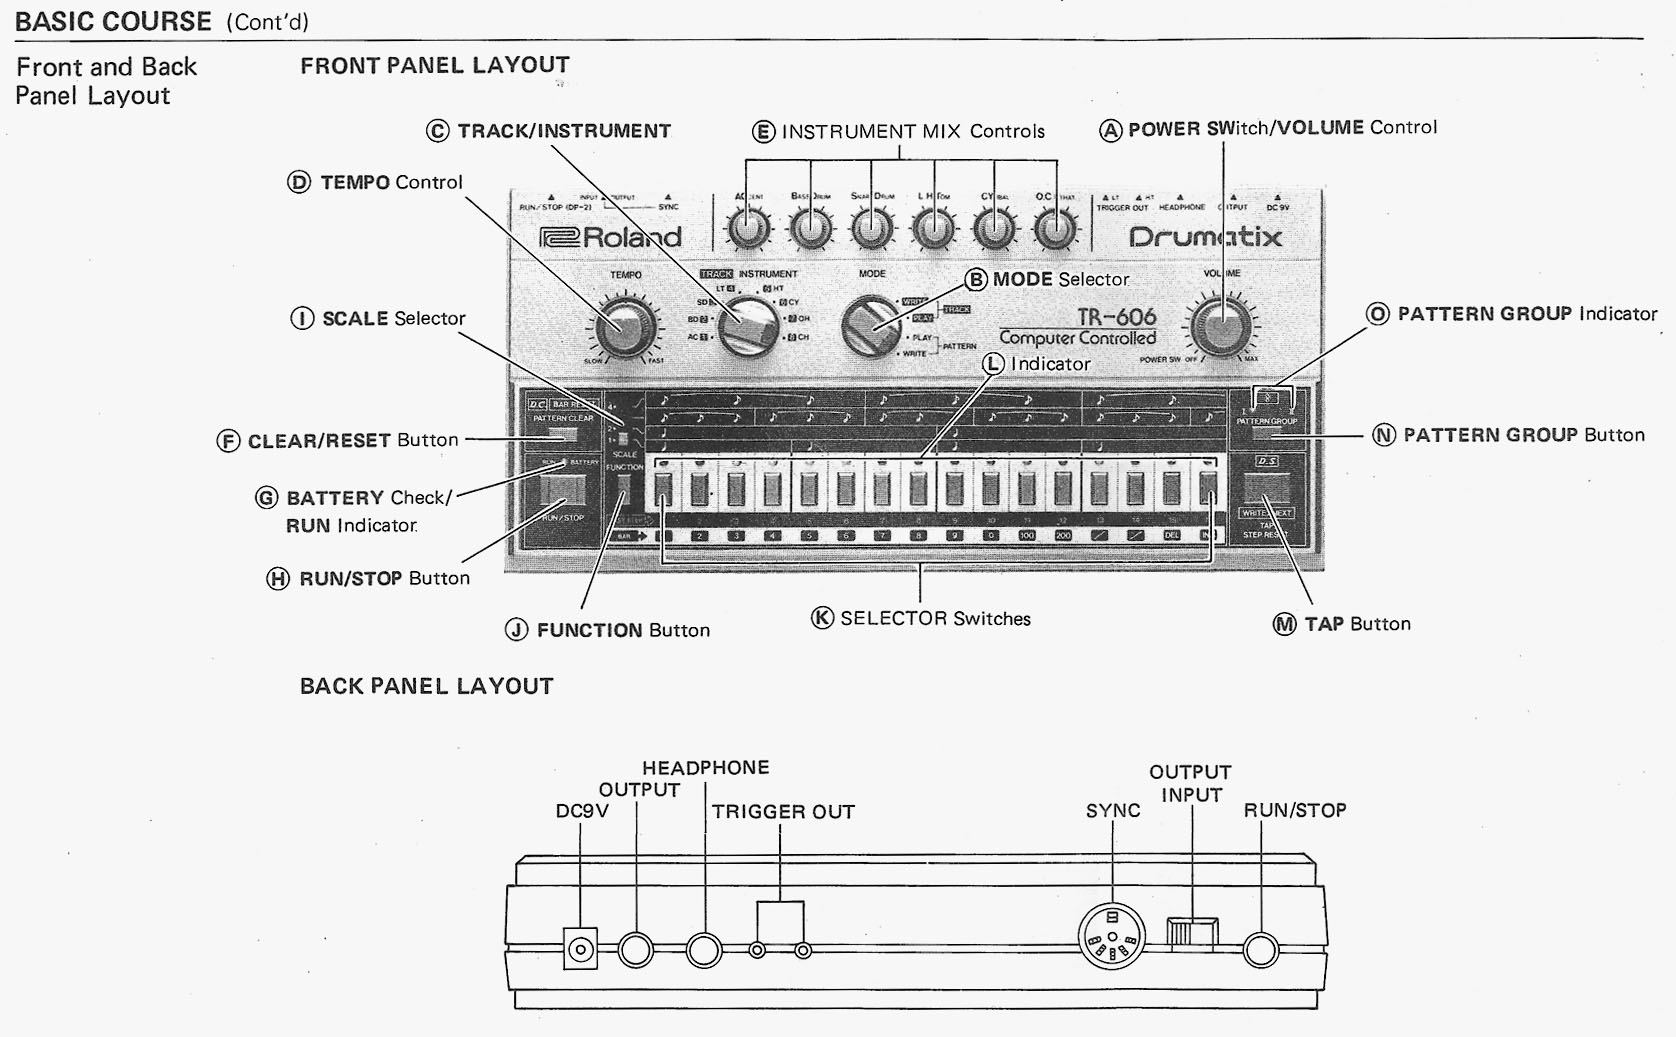
(A) = POWER SWitch/VOLUME Control
(B) = MODE Selector
(C) = TRACK/INSTRUMENT
(D) = TEMPO Contol
(E) = INSTRUMENT MIC Controls (six small volume knobs)
(F) = CLEAR/RESET Button
(G) = BATTERY Check/RUN Indicator (LED above RUN/STOP button)
(H) = RUN/STOP Button
(I) = SCALE Selector (4 way switch above FUNCTION button)
(J) = FUNCTION Button
(K) = SELECTOR Switches (the 16 buttons along the bottom of the front panel)
(L) = Indicator (the LEDs above the 16 SELECTOR switches)
(M) = TAP Button
(N) = PATTERN GROUP Button
(O) = PATTERN GROUP Indicator (LED above PATTERN GROUP button)
Writing Rhythm Patterns
We will write a 4/4 Rock Rhythm Pattern (shown in Fig. 1) into the
computer memory location chosen by the SELECTOR swirtch (K) #1.
Fig. 1

step no. --> 1234567890123456
BD           x-----x---x---x-
SD           ----x-------xx--
OH           --------------x-
CH           xxxxxxxxxxxxxx--
AC           x---x-----x-x-x-
PROCEDURE
-
Connect either headphones or an amplifier to the TR-606, (see BASIC CONNECTIONS).
-
Turn the POWER switch (A) on. (Clockwise).
-
Turn the TEMPO control (D) and INSTRUMENT MIX controls (E) to the mid
point.
-
Set the MODE selector (B) to PATTERN WRITE position.
-
Press the PATTERN GROUP button (N) to select Pattern Group I.
* The PATTERN GROUP button (N) switches alternately between I and
II and illuminates the selected indicator.
-
Press the #1 SELECTOR switch (K), which is the location where we will
write the first Rhythm Pattern.
* The selected indicator (#1) should be flashing.
-
While holding down the #1 SELECTOR switch (K) down, press the
CLEAR/RESET button (F).
-
Press the RUN/STOP button (H).
* The RUN/BATTERY LED (G) lights up and the other LED INDICATORS
(L) begin scanning across from #1 to #16, step by step.
-
Set the SCALE selector (I) to #1, then press the FUNCTION button
(J).
* When the FUNCTION button (J) is held down, the TR-606 displays
the position of every quarter note on the LED indicators (L).
* If you make a mistake, or wish to change the SCALE, simply repeat
operation 9. (Refer to the ADVANCED COURSE
MANUAL for details).
-
While holding the FUNCTION button (J) down, press the SELECTOR switch
(K) of the last step in the measure. In this case, press #16.
* The LED indicators (L) begin scanning across from #1 to the
last step that is #16 in this case.
Once again, if you made a mistake, just repeat operation 10.
-
Select the instrument to be written by rotating the TRACK/INSTRUMENT
selector (C). Set it at BD (Bass Drum) in this case.
-
Press the SELECTOR switches (K) corresponding to the dots [i've used
Xs - ed] in the score (Fig. 1) one by one.
* The LED indicators (L) of the selected steps will light, and
you will hear the selected instrument sound on those steps.
* You can adjust the speed using the TEMPO control knob (D). This
will allow you to write at a slower speed, if a faster speed proves
difficult, etc.
* If you press the wrong SELECTOR switch (K), just press the same
SELECTOR switch (K) again, and then the written sound will be erased
and the LED indicator (L) will be turned off.
-
Repeat 11-12 for the other instruments in the Fig. 1 example.
* BD . . . . . . . .Bass Drum
SD . . . . . . . .Snare Drum
LT . . . . . . . .Low Tom
HT . . . . . . . .High Tom
CY . . . . . . . .CYmbal
OH . . . . . . . .Open Hi-Hat
CH . . . . . . . .Closed Hi-Hat
AC . . . . . . . .ACcent
* If you want to erase a note, simply press the respective SELECTOR
switch (K). When you want to erase all of the notes of the selected
instrument, hold the CLEAR/RESET button (F) down until all the notes
are cleared.
* Erasing is completed when all the LED indicator (L) lights are
out.
-
The pattern can also be written in real time by using the TAP method
(M). While the Rhythm is running, just press the TAP button (M) at
the appropriate places in the measure.
-
Press the RUN/STOP button (H).
* You have just written the Rhythm Pattern indicated in Fig. 1
into the computer memory.
IMPORTANT NOTES
When pressing the button, do not fail to release it once, and go on
to the next operation, except for the cases that it is specifically
instructed to keep pressing the button. (The TR-606 does not function
properly if you go on to the next operation without releasing the
button.)
-
Now, write the Rhythm Patterns in Fig. 2 into the assigned memory
locations by repeating the procedures 6 to 15.
Fig. 2

* POSITION --> PATTERN GROUP I-1
   1234567890123456
BD x------xx-x---x-
SD ----x-------xx--
OH --x---x---x---x-
CH xxxxxxxxxxxxxxxx
AC x-x-x-x-x-x-x-x-

* POSITION --> PATTERN GROUP I-2
   1234567890123456
BD x------xx--x----
SD ----x-----------
LT ------------xxxx
HT --------xxx-----
OH --x---x----x----
CH xx--xx--x---x---
AC x-x-x-x-x--x--x-

* POSITION --> PATTERN GROUP I-3
   1234567890123456
BD x------xx-------
SD --x--x--x--x----
LT --------------x-
HT ------------x---
CY x---------------
OH --xx--xx--xxx---
CH xxx-xxx-xxxx--xx
AC x-xx-xx-x-xxx-x-

* POSITION --> PATTERN GROUP I-4
   1234567890123456
BD x----x--x--x----
SD ---x----x--x-xxx
LT ------x---------
CY --------x--x--x-
OH -x--x-----------
CH x-xx-xxx--------
AC xx-xx-x-x--x--x-

* POSITION --> PATTERN GROUP I-5
   1234567890123456
BD x------xx-x--x--
SD ----x-------x---
CY x---------------
OH --x---x---x---x-
CH xxxxxxxxxxxxxx--
AC x-x-x-x-x-x-xxx-

* POSITION --> PATTERN GROUP I-6
   1234567890123456
BD x------xx-x--x--
SD ----x------xx---
OH ---x--x---x--x--
CH xxx-xxxxxxxxx-xx
AC x-xxx-x-x-x-xx--

* POSITION --> PATTERN GROUP I-7
   1234567890123456
BD x------xx-x--x--
SD ----x-------x---
OH x-x---x---x--x-x
CH -xxxxxxxxxxxx-x-
AC x-x-x-x-x-x-xx-x

* POSITION --> PATTERN GROUP I-8
   1234567890123456
BD x-----xx-----x--
SD ----x--x-xxx----
HT ------------xxxx
CY -------x--------
OH -x--------------
CH x-xxxxx---------
AC xx--x--x--xx-xx-

* POSITION --> PATTERN GROUP I-9
   1234567890123456
BD x--x----x--x-x--
SD ----x----x-xx---
LT --------------x-
HT ------x---------
CY x---------------
OH --x---x---x---x-
CH xx-xxx-xxx-xxx-x
AC x-x-x-x--xx-x-x-

* POSITION --> PATTERN GROUP I-10
   1234567890123456
BD x--x-x--x-------
SD x------x--------
LT --x-------------
HT -x--------------
CY --------x-------
OH ---x-x----------
CH ----x-x---------
AC xx-x-x-xx-------
NOTE: If you write OH upon CH, CH will gain Accent.
Playing Rhythm Patterns
We have just programmed ten Rhythm Patterns. We will now play these
Rhythm Patterns and show some new functions.
PROCEDURE
-
Set the rhythm to stop position by pressing RUN/STOP (H).
-
Set the MODE selector (B) to PATTERN PLAY.
-
Select Pattern Group I (N).
-
Select a Rhythm Pattern by pressing the SELECTOR switch (K) (press #1
in this case).
-
Press the RUN/STOP button (H) to start the rhythm running.
-
Press another SELECTOR switch (K). (Press #2 in this case).
* At the end of the first Rhythm Pattern, the #2 Rhythm will
begin to play and repeat.
-
Press the SELECTOR switches (K) #2 and #4 simultaneously.
* The LED indicators (L) #2, #3, and #4 will light up, and the
rhythms will play in sequence from #2 to #3 to #4 and then back to #2
again.
* This is called CHAINING THE RHYTHM PATTERNS. Rhythms can be
chained up to four rhythms in a block. The TR-606 has four blocks,
#1-4, 5-8, 9-12, and 13-16.
-
NOTE: The TR-606 can only chain rhythms within the blocks
indicated above, it cannot for example, chain from #3 to #6.
-
Press the SELECTOR switch (K) #1 again.
* The rhythm returns to #1 rhythm at the end of the #4 rhythm and
repeats rhythm #1.
-
Press the RUN/STOP button (H) to stop the rhythm.
Composing the Rhythm Track
We have programmed ten Rhythm Patterns shown in Fig. 2 into the memory
locations #1 - #10. Through the use of these rhythms, we will now
compose an entire composition in Track #1 according to the following
composition table.
Fig. 3  Track Composition Table
| I-1 |  %  |  %  | I-2 |
| I-5 | I-6 | I-7 | I-8 |
| I-9 | I-3 | I-9 | I-4 |
| I-9 | I-3 | I-9 | I-10|
PROCEDURE
-
Stop the rhythm.
-
Set the MODE slector (B) to TRACK/WRITE.
-
Set the TRACK/INSTRUMENT selector (C) to Track #1.
-
Press the CLEAR/RESET button.
* This button re-sets the first bar of the Track.
-
Select in PATTERN GROUP I (O).
-
Start the rhythm, by pressing RUN/STOP (H).
* The rhythm previously recorded in the 1st bar of the Track will
be heard.
-
Choose a new 1st bar Rhythm Pattern by pressing SELECTOR switch (K),
in this case #1.
* The new Rhythm Pattern will play at the end of the old rhythm,
and will repeat.
-
Press the TAP button (M).
* The running Rhythm Pattern will be recorded in the Track Memory
as the 1st bar, and the Track Memory is advanced to the 2nd bar, and
it will play the previously recorded old rhythm.
You can re-select a new 2nd bar Rhythm Pattern and then press the
TAP button (M) to record it in Track Memory.
(Repeat the PROCEDURES 7 & 8 for bars following the 2nd bar
within a block. 4 patterns can be written at once between the 5th and
the 8th bar by following method given in CHAINING THE RHYTHM
PATTERNS, see page 11.)
-
Continue switching Rhythm Patterns and logging them into Memory by
pressing the TAP button (M).
Repeat the PROCEDURES 7 & 8 for writing from the 9th bar to the
one before the the last bar.
-
At the last bar, where the SELECTOR switch #10 is pressed in this
case, choose a rhythm and then press the CLEAR/RESET button (F).
* By pressing the CLEAR/RESET button (F), you have set the last
rhythm as the D.C. bar. The D.C. bar is the last bast in the
composition, and after playing the D.C. bar, the Track will return to
the first bar of the Track and play the entire Track again from the
beginning (1st bar).
-
Press the TAP button (M) to write the rhythm as the D.C. bar in the
Track Memory.
-
Stop the rhythm. (Press the RUN/STOP button)
Now you have programmed the entire compositions shown in Fig. 3, into
Track #1.
The program can be checked and corrected from the beginning of the
Track by the following procedure:
-
Stop the rhythm.
-
Set the MODE selector (B) to TRACK WRITE.
-
Press the CLEAR/RESET button (F) to re-set the Track to the 1st bar.
-
Start the rhythm.
Check the Rhythm LED indicators (L) which display the Rhythm Pattern
numbers.
-
If the rhythm number is wrong, press the SELECTOR switch (K) to
rewrite the correct Rhythm Pattern, and then press the TAP button (M)
to write it into Memory.
If it is all right, just press the TAP button (M) to advance to the
next bar.
-
Repeat step 5 until you reach the last bar (D.C. bar).
-
Stop the rhythm.
A composition of up to 64 bars in a Track can be programmed. The TR-606
has 8 Tracks. Refer to the ADVANCED COURSE
MANUAL for details.
Playing the Rhythm Track
-
Stop the rhythm.
-
Set the MODE selector (B) to TRACK PLAY.
-
Set the TRACK/INSTRUMENT selector to #1.
* The PATTERN GROUP will be selected automatically
-
Press the CLEAR/RESET button (F) to reset the Track to the 1st bar.
-
Start the rhythm.
* The rhythm will run and return to the 1st bar of the track at
the end of the D.C. bar. This will be continuously repeated.
back to contents page