Front and Back Panel Layout
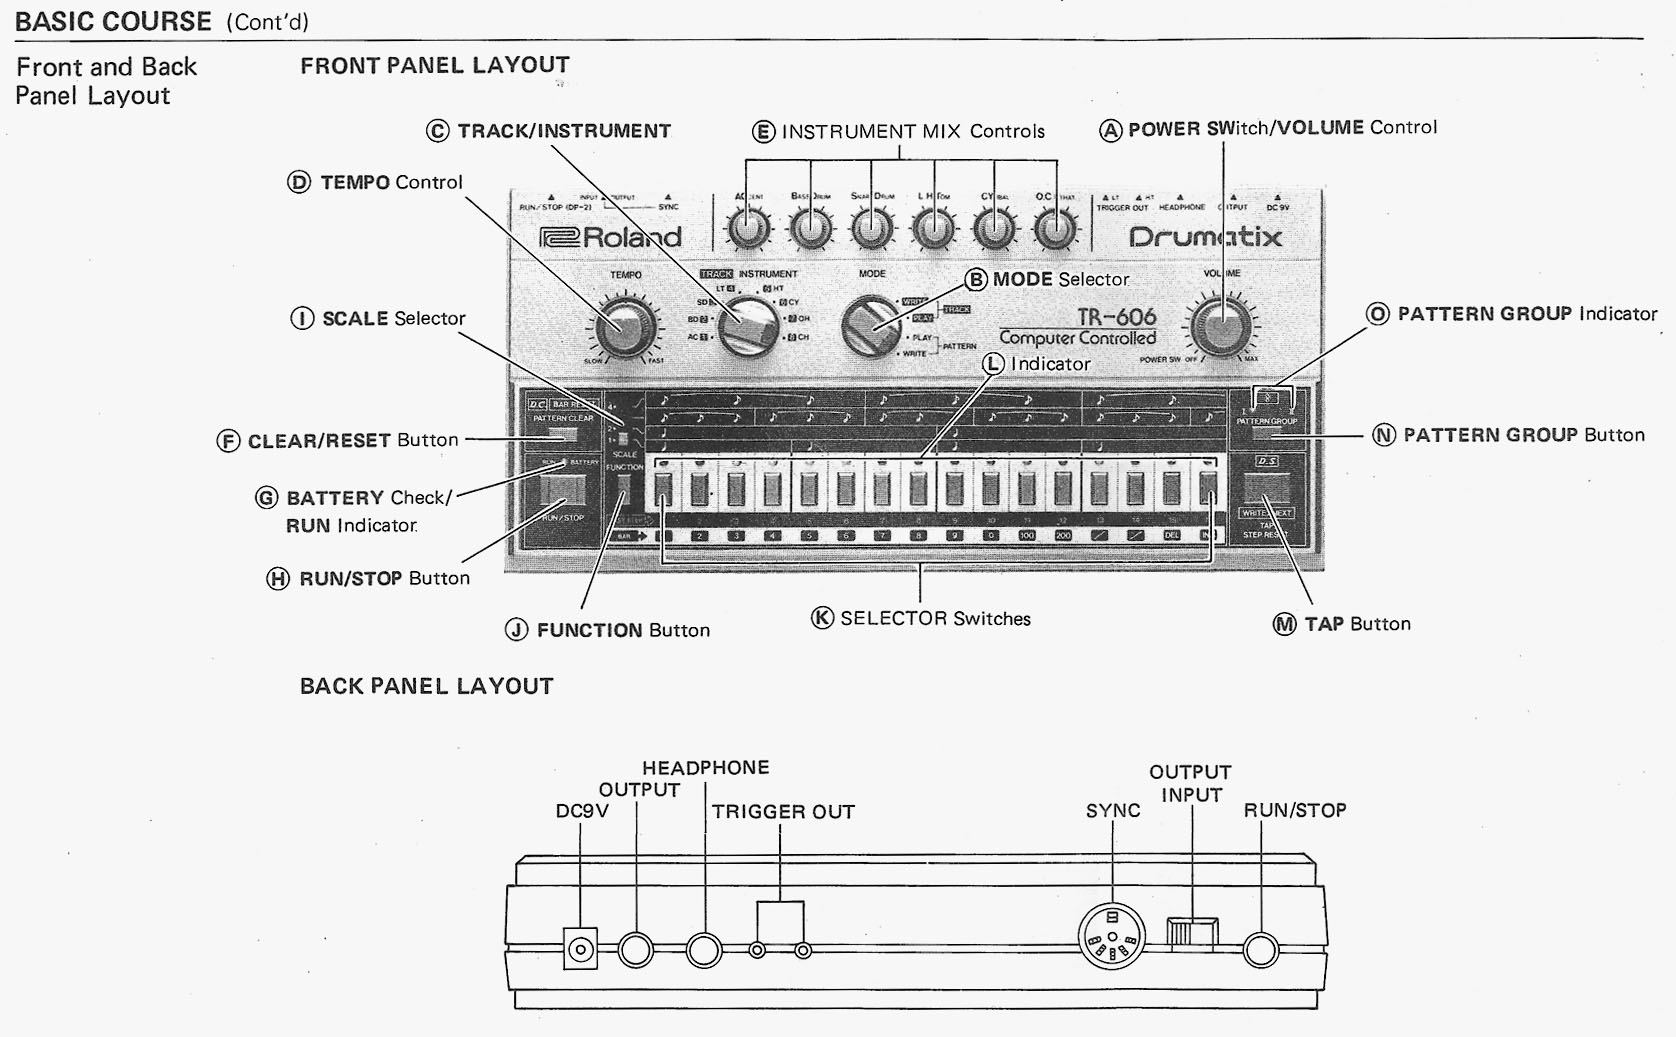
(A) = POWER SWitch/VOLUME Control
(B) = MODE Selector
(C) = TRACK/INSTRUMENT
(D) = TEMPO Contol
(E) = INSTRUMENT MIC Controls (six small volume knobs)
(F) = CLEAR/RESET Button
(G) = BATTERY Check/RUN Indicator (LED above RUN/STOP button)
(H) = RUN/STOP Button
(I) = SCALE Selector (4 way switch above FUNCTION button)
(J) = FUNCTION Button
(K) = SELECTOR Switches (the 16 buttons along the bottom of the front panel)
(L) = Indicator (the LEDs above the 16 SELECTOR switches)
(M) = TAP Button
(N) = PATTERN GROUP Button
(O) = PATTERN GROUP Indicator (LED above PATTERN GROUP button)
(E) INSTRUMENT MIX Controls
These controls, located at the top center of the control panel, are
used to achieve a balanced mix between the various instrument voices
available with the TR-606.
(D) TEMPO Control
This rotary pot is used to control Tempo of the TR-606's rhythms. Tempo
is not a programmable function, and may be varied during the writing or
playing of the Rhythms or Tracks for maximum control and flexibility.
(C) TRACK/INSTRUMENT Selector
This 8 position selector serves for a dual purpose. During the
programming of Rhythm Patterns, it is used to select any one of 7
different instrument voices or Accent programmed.
The second function of the control is as a selector for the 8 memories
used in composing Rhythm Tracks. Each of one of the Memories 1 to 7
contains storage capacity for 64 bars of a Rhythm Track, while memory 8
has a storage capacity for 256 bars of a Rhythm Track. Each of these
memories may be accessed individually for programming or playback. Up
to four tracks may be chained together for composing Tracks of extended
length, with a maximum track length of 256 bars.
(B) MODE Selector
This rotary control is used to select one of the four basic operation
modes of the TR-606:
PATTERN WRITE Mode allows you to program the available Rhythm Pattern (16 each in Pattern Groups (N) I and II) to be programmed with any desired rhythm for each of seven instruments plus Accent.
PATTERN PLAY Mode allows performance of the 32 available Rhythm Patterns you have programmed. Rhythm Pattern selections are made using the 16 Selector Switches (K) and the Pattern Group (N) Selector. Within certain guidelines, adjacent Rhythm Patterns may be chained together to perform as single, or more complex Rhythm Patterns.
TRACK PLAY Mode allows the performance of an entire Rhythm Track composition programmed into one or more of the 8 TRACK Selector positions.
TRACK WRITE Mode allows any of the 16 Rhythm Patterns programmed into Pattern Group I (N) (or the 16 Pattern Group II rhythms) to be combined into compositions (Tracks) and programmed into any one or more consecutive memories selected by the Track selector.
(A) POWER SWitch/VOLUME Control
The master VOLUME Control (A) also serves as the power On/off Switch,
cutting off all D.C. power to the TR-606 when rotated fully
counterclockwise. For the TR-606 to perform any function, this switch
must be rotated clockwise past its initial detent. The 'On' status of
the TR-606 may be checked using the various LED indicators (L) on the
front panel.
Once the POWER SWitch/VOLUME Control (A) is pasts its initial detent,
it will control the overall output level present at the Output and
Headphone output jacks for anmplification and monitoring.
(F) CLEAR/RESET Button
Depending on the MODE Selector (B) position, and the RUN/STOP
condition, this button will perform the following functions:
When stopped in the PATTERN WRITE Mode, this button will clear an entire rhythm pattern by pressing it while holding the SELECTOR Switch (K) down for the Rhythm Pattern to be cleared. The scale and number of Steps in the Rhythm Pattern will not change.
[Additionally, when running in pattern write mode, it will clear individual instruments from the pattern if you hold it down - ed]
When running in the PATTERN PLAY Mode, this buttone has no effect.
When stopped in the TRACK PLAY Mode or TRACK WRITE Mode, this button Resets the TR-606 so that it will begin with bar 1 of the Track selected when the RUN button (H) is pressed. If this button is pressed while the FUNCTION button (J) is held down, the D.C. bar will be displayed using the LED indicators (L).
When running in the TRACK PLAY Mode, this button has no effect.
When running in the TRACK WRITE Mode, this button writes the current bar to memory as a D.C. bar, signalling the end of the track.
(G) BATTERY CHECK/RUN Indicator
This LED will light to indicate the Run condition. If the indicator
flashes or does not illuminate in the Run condition even if the other
LEDs still illuminate, replace all of the batteries with new ones.
(H) RUN/STOP Button
This button alternately starts and stops the running of rhythms, and
will perform differently according to the position of MODE Selector
(B).
(I) SCALE Selector
This selector determines the number of steps assigned to each quarter
note beat, as shown by the relationship between the graphic
illustration to the right of the SCALE Selector (I) and the 16 SELECTOR
Switches (K) below. The position of the SCALE Selector is memorized
into computer memory when the FUNCTION button (J) is pressed while
running in the PATTERN WRITE Mode.
(J) FUNCTION Button
This button will perform different functions according to the RUN/STOP
condition and the MODE Selector (B) position.
When stopped in the PATTERN WRITE Mode, this button has no effect.
When running in the PATTERN WRITE Mode, pressing the FUNCTION button (J) will memorize the SCALE Selector (I) position and virtually display the first step of each quarter note beat using the 16 LED indicators (L) and allows you to set the last step by pressing the SELECTOR Switch (K).
In the TRACK PLAY and TRACK WRITE MODE, pressing the FUNCTION button (J) will display the current bar number within the Track using the LED indicators (L). While the FUNCTION button (J) is being held down, the SELECTOR Switches (K) and their associated LED indicators (L) may be used to change the current bar number. Finally, while the rhythm is stopped, hold the FUNCTION button (J) down while pressing either the CLEAR/RESET (F) or PATTERN GROUP (N) button to display the bar number of the D.C. or D.S. sign, respectively using the LED indicators (L).
(L) LED Indicators
The 16 LED Indicators (L) located directly above the SELECTOR Switches
(K) are used to indicate the Rhythm Pattern number, Steps within a
Rhythm Pattern, or Bar Numbers, depending on the use of the other
TR-606 controls. Details of these different applications and reading
Bar numbers are given in the Operation section of
this manual.
(K) SELECTOR Switches
These 16 switches will perform different functions according to the
RUN/STOP condition and the MODE Selector position.
When stopped in the PATTERN WRITE and PATTERN PLAY Mode, the SELECTOR
Switches (K) determine whether an individual Rhythm Patterns or a
Chained Rhythm Pattern will begin when the RUN/STOP button (H) has been
pressed. A maximum of four adjacent Rhythm Patterns within the blocks
of 1-4, 5-8, 9-12, and 13-16 may be chained together to perform as one
complex Rhythm Pattern and may be played once or repeated as a single
unit.
When running in the PATTERN WRITE Mode, the SELECTOR Switches (K) are
used to write the instrument selected with the TRACK/INSTRUMENT
Selector (C) into specific steps of the Rhythm Pattern. Details of this
procedure are given in the Operation section of
this manual.
When stopped in the TRACK PLAY and TRACK WRITE MODE, holding the FUNCTION button (J) down allows the SELECTOR Switches (K) to be used to select any specific bar number in that track.
When running in TRACK WRITE Mode, the SELECTOR Switches may be used to select individual Rhythm Patterns or to designate Chains of Rhythm Patterns. Note: The Rhythm Patterns heard here are not written into the Track memory until the TAP switch (M) is used.
(N) PATTERN GROUP Button
Depending on the MODE Selector (B) position and the RUN/STOP condition,
this button will perform the following functions:
When stopped in the PATTERN WRITE and PATTERN PLAY MODE, and when stopped in the TRACK WRITE Mode the PATTERN GROUP button (N) switches the TR-606's memories between the 16 Rhythm Patterns in PATTERN GROUP (N) I and the 16 Rhythm Patterns in PATTERN GROUP (N) II.
When stopped in the TRACK PLAY Mode, the Pattern Group number which has been to program the Track in the PATTERN WRITE Mode will be selected automatically. The PATTERN GROUP button (N) itself will have no effect.
When stopped in the TRACK WRITE or TRACK PLAY Mode, hold the PATTERN GROUP button (N) down while pressing the FUNCTION button (J), and the LED indicators (L) will display the bar number to which the $ sign has been assigned.
When stopped in the TRACK WRITE Mode, the PATTERN GROUP button (N) selects the PATTERN GROUP to be written into that Track Memory.
When running in the TRACK WRITE Mode, the PATTERN GROUP button (N) will assign the current bar as the $ sign bar in the Track memory.
(M) TAP Button
Depending on the MODE selector (B) position and the RUN/STOP condition, this button will perform the following functions:
When running in PATTERN WRITE Mode, this button will perform the real time Tap programming.
When running in the PATTERN PLAY Mode, the TAP button (M) acts as a STEP RESET button (M) to cause the Running Rhythm Pattern to immediately begin again from the first Step of the current Rhythm.
When stopped in the TRACK PLAY or TRACK WRITE Mode, the TAP button (M) will advance the bar further into the selected track.
When running in the TRACK PLAY Mode, pressing the TAP button will immediately return the Track being played to the measure that has been assigned the $ sign and continue normally from that point.
When running in the TRACK WRITE Mode, the Tap button will perform a
WRITE/NEXT function (M), writing the Rhythm Pattern currently being
heard and indicated on the LED indicators (L) into the Track memory and
advancing the bar number assignment accordingly.
This WRITE/NEXT function (M) always deals in complete Rhythm Pattern
units. If a chained Rhythm Pattern is written into a track using the
TAP button (m), the Bar number will advance the number of bars
contained within the Chained Rhythm Pattern.
Connection Cords
The TR-606 is provided with a low noise connection cord terminating in
a 1/4 inch phone jack for connection with the Drumatix output at one
end and with an RCA connection with an adaptor to a 1/4 inch phone jack
for amplification connection at the other end. The 1/4 inch phone jack
adaptor will be used for most of amplification connections.
The RCA jack offers access to most component hi-fi systems, a
significant advantage when the TR-606 is used for practice or
composition at home without the inconvenience of transporting and
setting up stage amplification. Connect the TR-606 output with an Aux.
or Tape input, avoiding Phono inputs with their special internal
equalization. The TR-606 will appear at one speaker only unless a 'Y'
cable or junction box such as the Boss J-5 is used, or unless you hi-fi
has a master Mono/Stereo selector.
Important Note: Begin with the volume level on your TR-606 set at Zero
and the hi-fi at normal or lower than normal levels. By gradually
raising the TR-606 level and using caution as different programs and
instrument levels are selected you can easily avoid high level signals
that might otherwise damage sensitive hi-fi equipment.
The RCA jack also offers instant access to many multi-track recorders and consoles, a distinct advantage considering the unique functional abilities of the TR-606 Drumatix.
TRIGGER OUTputs
The TR-606 Rhythm Composer provides two independant, programmable
TRIGGER OUTs to allow interfacing with synthesizers or sequencers. Each
trigger is a positive 15 Volt, 20 millisecond pulse suitable for
activating either the Trigger or Gate inputs of most major brands of
equipment.
A synthesizer such as the Roland SH-09 may be gated to process its own oscillators. By combining a mono synthesizer such as the SH-09 with a sequencer such as one of the Roland CSQ digital sequencers, the TR-606 TRIGGERs will start and/or step the sequencer/synthesizer combination for many programmed musical lines. The triggers may also be used to control the rhythm and rate of the Arpeggio sections of the Roland JUPITER polyphonic synthesizers.
The two TRIGGER OUTs correspond to rhythms programmed into the Low Tom or High Tom positions, rhythms determined by the Track/Program selector and programming. These instruments may be used simultaneously with their TRIGGER OUT or programmed specifically to provide with TRIGGER OUTPUT rhythms, silencing the instruments using the individual INSTRUMENT MIX LEVEL (E) controls.
[The trigger outputs can also be used to trigger other analog drumkits, such as those made by Simmons, Midwest Analog Products, etc. - ed]
Pedal Switching
The TR-606 is equipped with a 1/4 inch Pedal Switch jack for connection
with an optional Roland DP-2 Damper Pedal. This jack provides with a
remote control option for the RUN/STOP button without defeating the
function of the front panel RUN/STOP itself.
SYNC INPUT/OUTPUT
The SYNC switch on the TR-606 allows it to be synchronized perfectly
with units such as the Roland CSQ-600 Digital Sequencer, allowing total
rhythmic freedom of each unit while remaining in perfect tempo with on
another. This interfacing uses the exclusive Roland standard interface
connection.
The TR-606 may also be synchronized to the Arpeggio section of the Jupiter-8 polyphonic synthesizer.
To Sync two units, connect a five pin DIN cord with the SYNC jack of each unit and move the TR-606 SYNC switch to the INPUT position for connection with the CSQ-600, or to the OUTPUT position for connection with the Jupiter-8. Remember that the SYNC switch must be in the OUTPUT position so that the TR-606 will operate by itself.
The TR-606 may also be synchronized to the Roland MC-4 polyphonic sequencer, using either the TR-606 or the MC-4 to control the other unit. For more details, refer to the MC-4 owners manual.
Battery Eliminator
The TR-606 is fully portable, normally relying on batteries for all
internal functions and to power the self-contained Headphone amplifier.
To extend battery life, merely connect a BOSS ACA Battery Eliminator to
this socket.
"CAUTION" Don't connect any other brand of Battery Eliminator, as this could damage the internal circuitry of the TR-606. [Actually, any 9V DC adaptor with center negative providing 150mA of current will work - ed]
Memory Back-Up
The TR-606 Rhythm Composer features a non-volatile memory which will
retain Rhythm Patterns and Track compositions when switched 'OFF' and
disconnected from any external power source. The TR-606 relies on
batteries for it's back-up circuit to protect these memories. Always
replace the TR-606's batteries with a complete set of fresh batteries
when the RUN/BATTERY Indicator LED (G) either flashes or fails to
illuminate during the normal Run condition of the TR-606. If the
batteries are changed quickly, within one minute, the memory can retain
the DATA. [Check out battery.txt for
more information regarding this - ed]
The series of sixteen SELECTOR Switches (K) at the bottom of the TR-606 are used to select which Rhythm Patterns you want to play. Each of these sixteen SELECTOR Switches (K) has two modes (I & II) which can be different from each other for a total of thirty-two Rhythm Patterns, with each Rhythm lasting for one measure.
After hooking up the TR-606 as previously described in the Basic Connections Section, set the MODE Selector (B) to the PATTERN PLAY position. When this is done, you will notice that the LED on one of the SELECTOR Switches (K) will begin to flash. This tells you that the flashing SELECTOR Switch (K) is the first Rhythm Pattern that will play when you press the RUN/STOP button (H).
Also lit on the TR-606 Panel is one of the two LEDs above the PATTERN GROUP button (N). These indicate from which group (I or II) the flashing Rhythm will play. To change from one group to the other, press the PATTERN GROUP button (N), and the LED will change from one ot the other. PATTERN GROUP Selection is available only while the Rhythm is stopped. Press the RUN/STOP button (H) to start the Rhythm running. Adjust the overall Tempo with the TEMPO control (D) which is continuous from 40 to 300 beats per minute. While the Rhythm is running, you will notice that the LED indicators (L) on the SELECTOR Switches (K)flash in sequence from the left to the right of the unit. The speed of their sequential motion will correspond to the tempo of the pattern (which is set by the TEMPO control).
Press the RUN/STOP button (H) to stop the Rhythm. When this is done, you will notice that the LED on the Rhythm you had selected will again begin to flash.
Mixing Percussion Sounds
The level of each percussion sound can be raised or lowered in
accordance with your own taste through use of the six MIX controls (E)
at the top of the panel. By using these MIX controls (E), it is
possible to attain the perfect balance between the instruments for any
rhythm.
Switching Rhythm Patterns
It is possible to switch from one Rhythm Pattern to another while the
TR-606 Rhythm is running. The TR-606 will always finish the measure,
and play until switched to the newly selected Rhythm. By switching
between the Rhythms, it is possible to try various Rhythms together to
get a feel of switching from a straight beat to a fill or break.
Chaining Rhythm Patterns
You will notice that the sixteen SELECTOR Switches (K) have been
divided into four Block Groups of four switches each (1-4, 5-8, 9-12,
and 13-16). These represent groupings of Rhythm Patterns that can be
chained together to run sequentially in a group. This is used for
performing a two measure repeating rhythm (which is very common in Rock
Music), for doing 4/4 time using scale 2 or 4, or for doing odd time
signatures.
To chain Rhythm patterns together, press two SELECTOR Switches (K) (such as 2 and 4) in a group simultaneously. This action causes the first switch's LED (2) to flash while the others (3 & 4) illuminate but do not flash. This LED status indicates that the Rhythms are chained and will play in a sequence. It is possible to chain 2, 3, or 4 Rhythm Patterns together, but they must all be from the same group. You cannot, however, create more than one chain within each four groups.
For now, select the chained Rhythm Patterns 2, 3 and 4. Press SELECTOR Switches (K) 2 and 4 simultaneously, and then LED indicators (L) 3 and 4 illuminate while LED 2 flashes. Select one of the two PATTERN GROUPS (N) by pressing the PATTERN GROUP button (N). Again, the PATTERN GROUP selection is available only under Rhythm Stopped condition. Start the TR-606 playing by pressing RUN/STOP (H) and you will see that the Rhythm runs from 2 to 3 to 4 and then back to 2 again.
Press the TAP button (M) while the Rhythm is running. This action causes the running Rhythm to re-start from the first step of the Rhythm immediately. This re-set type of action allows for diverse and creative Pattern changes while a chained Rhythm is running as the Rhythm re-starts from the first step of whatever Rhythm is playing rather than from the beginning of the chain. For example, if you press the TAP button (M) while playing Rhythm Pattern 4 of the chained Rhythm 2, 3, 4, the Rhythm will re-start from the first step of #2 rather than #4.
[This is a stupid example. A better one would be: "if you press TAP while playing pattern 2 of the chained rhythm 2, 3, 4, the rhythm will restart from the first step of pattern 3 rather than pattern 2" - ed]
As mentioned earlier, your TR-606 will not only play back Rhythms but also allow you to write them as well. Because we are not just writing the Rhythms but storing them into computer Memory as well, we call this process "Programming". We will now program the Rhythm Score written in Fig. 2.
Fig. 2  Rhythm Score 1

   1234567890123456
BD x-----x---x---x-
SD ----x-------xx--
OH --------------x-
CH xxxxxxxxxxxxxx--
AC x---x-----x-x-x-
Stop the Rhythm if it is running, and set the MODE selector (B) to PATTERN WRITE. This will cause the LED on the Rhythm Pattern selected to stop flashing. Press SELECTOR Switch (K) #1 and set the PATTERN GROUP (N) to I. Clear the Memory in #1 position by pressing the CLEAR/RESET (F) button while holding down the #1 SELECTOR Switch (K). When this is done, the PATTERN GROUP indicator LED (O) will flash to indicate that the memory in position #1 has been cleared.
The TR-606 programs Rhythms in a Step Sequence process, which breaks each measure (and each beat) down into a series of steps so that the programming can be completely accurate. To Program a Rhythm, you must first set a Scale position which basically determines how many steps there will be for each beat (quarter note). This process will be described in detail later in this section.
Press the RUN/STOP (H) button, but you will not hear a Rhythm because it has been cleared. While the Rhythm is running, set the SCALE selector (I) switch to 1 and press the FUNCTION button (J). You have just set up a scale in which the quarter note will consist of four steps (each step corresponding to one sixteenth note). Once the FUNCTION button (J) has been pressed, the Scale is memorized for its selected position. While the FUNCTION button (J) is depressed, you will see the quarter notes (beats) displayed on the row of LEDs. For Scale #1 the LED displays show every fourth LED lit.
It is now necessary to choose the number of steps of which the measure will consist. While holding down the FUNCTION button (J), press the Selector Switch corresponding to the last step of the pattern (which in this case is 16). You have now set up a Rhythm Pattern consisting of sixteen note steps, with each beat (quarter note) consisting of four steps.
Step Programming
Choose an instrument sound to be programmed by rotating the
TRACK/INSTRUMENT selector (C) (located next to the MODE selector (B)).
It is usually easiest to program a Rhythm starting with the Bass Drum,
so rotate the selector to BD. On the Program Score 1 [that's Fig. 2 -
ed], you will see BD is to be played on Steps 1, 7, 11, and 15, so
touch the SELECTOR Switches (K) that correspond with these Step Numbers
described below them.
As is the case with many controls on the TR-606, the SELECTOR Switches
(K) serve a dual function that is both choosing Rhythms to be played
and also programming the Rhythm itself. You should now hear the Bass
Drum sound on those Steps that you selected. If this is not the case,
go back to the beginning of this section and repeat the process. When
the Bass Drum is sounding properly, switch the TRACK/INSTRUMENT
selector (C) to SD, and program the Snare Drum as it indicated on the
Program Score 1 at steps 5, 13, and 14.
Continue programming the other instrument voices indicated on the
Program Score. It may be easier for you to program if you adjust the
TEMPO to a slower speed. If you make a mistake and press the wrong
switch, simply press it again and the LED will go out indicating it has
been cancelled.
It is possible to clear all 16 steps of any selected voice by pressing
the CLEAR/RESET button (F) until all the notes are erased.
This saves time when clearing voices that have been programmed on every
step.
TAP Programming
While most of the programming is done using the Step method, it is also
possible to program in real time by a Tap method. While the Rhythm just
programmed is running, return the TRACK/INSTRUMENT selector (C) to SD
and cancel the Snare Drum sounds you programmed by pressing the
CLEAR/RESET button (F). You can now re-program the Snare Drum by simply
pressing the TAP button (M) at the appropriate places in the measure.
Wherever you pressed the TAP button (M), there will automatically be
programmed a Snare Drum sound.
If the Tapped Rhythm is out of sync with the others, it can be erased just the same as it is programmed in the Step method. Sometimes it may be easier to use the TAP (M) method when the Rhythm is running fairly slowly as synchronization is easier.
You have just programmed your first pattern into the TR-606. This Rhythm will be stored in memory and can be edited at PATTERN WRITE position.
Steps and Programming
With the TR-606, each measure is divided into a certain number of parts
which we call STEPS. The Rhythm you just programmed used a 16 Step
measure, which we played in 4/4 time. Therefore the measure was
comprised of four quarter notes, each quarter note was comprised of
four sixteenth notes, and each sixteenth note corresponding to one
STEP. So, for each Step in Program Score 1, each Instrument Voice had
either a beat or a rest. (The rest is added automatically when you do
not program a beat in that place).
The Program Score is a transcription of the music socre using the system that indicates the minimum number of notes and rests. However it is not completely musically accurate in that a quarter note, for example, when transcribed to the Program Score from a music score, is written as a sixteenth note, followed by three rests. This also follows for whole notes, half notes, and eighth notes as well.
The SELECTOR Switches (K) are arranged in the order of the sequence for the Rhythm Pattern. This means that in Rhythm Score #1, the #1 switch will indicate the beginning of the measure, and #16 equals the end of the measure. When the LED for step 16 lights up, one measure has been played.
Setting the SCALE (I)
The SCALEs (I) on the panel above the SELECTOR Switches (K) indicate
the SCALE (I) (or number of steps for each beat). Different SCALEs (I)
are chosen for different Rhythms so that all the Rhythms will be in
time with each other when you switch from one Rhythm to another as you
did in the Playing Rhythm Patterns Section. Some
Rhythms you may write may require as small a division as thirty second
notes, while other Rhythms you write need only sixteenth notes as the
smallest division. By choosing the proper SCALE (I) for the Rhythm, the
Rhythm Patterns will all be able to be played back in time with each
other when you switch between them. The SCALE (I) must always be chosen
to match the minimum division of the beat to be used in the Rhythm
pattern. We will now program a Rhythm in 4/4 time: one that uses a 12
Step measure and the Number 3 Scale.
More details are explained in the last part of this manual (P. 30).
Fig. 5

   123456789012
BD x-----x-----
SD ---x-----x--
OH x-----x-----
CH ---x-x---x-x
AC ---------x--
Stop the Rhythm and set the MODE SELECTOR (B) to PATTERN WRITE. Press SELECTOR Switch (K) #1 so we can program in this position. The LED on that switch should light up and flash. Press the CLEAR/RESET button (F), erasing the memory. Press the RUN/STOP button (H) and set the SCALE selector (I) switch to 4. Press the FUNCTION button (J) but do not let it up. While holding it down, press the switch for step #12, and then release the FUNCTION button (J). You have just set a 12 Step pattern using a #3 Scale.
With the TRACK/INSTRUMENT selector (C), choose the sounds you need to program the Program Score #2 as shown in Fig. 5. Program this Rhythm as you had done in Program Score #1. Programming of I and II PATTERN GROUPs (N) is done in the same manner, the sole difference being the position of the PATTERN GROUP switch (N) during the programming.
Writing Chained Rhythm Patterns
The Chained Rhythm Pattern can be selected in the PATTERN WRITE MODE
while the Rhythm is stopped. This is done the same way as was done in
the PATTERN PLAY Mode, by simultaneously pressing and two of the
SELECTOR Switches (K) within a group (1-4, 5-8, 9-12 or 13-16). As we
said before, Chained Rhythm Patterns can be used to create Rhythm
Patterns of two or more measures in length or to create Rhythm Patterns
in odd time signatures.
Chained Rhythm Patterns are also mentioned in CHAINING RHYTHM PATTERNS (See Basic Course)
We will now program the following Rhythm Patterns using two Rhythm Patterns chained together. Stop the Rhythm and set the MODE selector (B) to PATTERN WRITE. Press SELECTOR Switches (K) 1 and 2 simultaneously, and while holding them down, press the CLEAR/RESET button (F).
Release all buttons, and the two Patterns will be cleared. Start the Rhythm, the TR-606 runs from #1 to #2 and back to #1. Set the SCALE switch (I) to 2 and push the FUNCTION button (J). While holding the FUNCTION button (J) down, press SELECTOR Switch (K) #16 to set a sixteen step pattern in #1 position. Repeat the same procedures while the Rhythm runs to #2 position to set the same SCALE and STEP Number. You have just set up a Rhythm Pattern that extends over two Selector positions which gives you a total of 32 steps for the measure (each step now corresponding to a thirty-second note). TAP programming is easier in this case than Step programming.
[This is because when pattern 2 is playing, you can't edit pattern 1, and vice versa. If you turn the tempo down as low as it goes, step programming isn't too hard any more, but then you lose the flow of the track if you're playing live. Check out live.txt for some hints on using these functions in a live situation - ed]
Program the following Rhythm Program Score (Shown in Fig. 6)
Fig. 6

   1234567890123456    1234567890123456
BD x-----x---------    --------x-------
SD ----------x-----    x---------------
LT ----------------    --------x-------
OH x---------------    ----x-------x---
CH -xxxxxxxx-x-x-x-    x-x---x-x-x---x-
AC x-----x-x-------    x-------x-------
Press RUN/STOP (H) when programming has been completed. As you can see, Chaining Rhythms are used to program a measure requiring more than 16 Steps. With the Clearing operation (pressing the CLEAR/RESET button (F)), both of two patterns are erased. When using Chained Rhythms, it is necessary to set up the SCALE and STEP number for each Rhythm used. However, the number of STEPS or SCALE of the Chained Rhythms do not have to be the same.
It is possible to select different SCALE and different STEPs for each Chained Rhythm by quickly changing the SCALE and STEP selection while the TR-606 runs from one Chained Rhythm to the other. This is usually most successful if it is done while the TEMPO is running fairly slowly.
The easiest way to program a Chained Rhythm is to program each Rhythm Pattern individually, and then chain them together.
Fig. 7

   123456789012    123456789
BD x-------xx--    --------x
SD --x--xxxx--x    -x-x-xxxx
CH x-xx-xx-xx-x    x-xx-xx-x
AC --x---x----x    --xx-xx--
The program score in Figure 7 shows a Chained Rhythm in which the Rhythms have a different number of STEPs. To program Figure 7, set the SCALE at 3, and set the number of STEPs in the first Rhythm Pattern at 12 and the number of steps in the second Rhythm Pattern at 9.
[You can get far more complex chained rhythms when you give each pattern a different scale setting as well. Look at the last sample pattern for a good example - ed]So far, we have used many of the TR-606 performance controls to produce creative and interesting results, but a function that completely sets the TR-606 apart from any other device is its ability to record an entire composition's percussion score (which we will call the Rhythm Track).
A Rhythm Track is composed (as we call it) in real time, and in much the same way you have programmed Rhythm Patterns, by using the Rhythm SELECTOR Switches (K) to change from one Programmed Rhythm to another. We will program a short Rhythm Track from some Rhythms you now have in memory.
Track Memory
The TR-606 contains eight different tracks which can be used for eight
different songs or for a less number of songs longer in length. Each of
the tracks #1-7 contains enough memory storage capacity to create songs
of up to 64 bars in length. For songs that are longer than 64 bars,
these Tracks can be run together. Up to 4 tracks can be chained
together in this manner to create songs of 256 bars in length (4 Tracks
x 64 bars each = 256).
The last Track #8 contains more memory than any of the others having 256 bar storage when used by itself. However, even when chained with other Tracks, the maximum storage of the Chained Tracks remains at 256 bars.
Composing the Track
To compose a Track, first stop the Rhythm, then set the MODE selector
(B) to TRACK WRITE and select a Track to write into by rotating the
TRACK/INSTRUMENT Selector (C). For now, begin with Track #1. By setting
the TRACK/INSTRUMENT Selector (C) at #1 position, you ensure that the
Track you are composing will begin on the first bar of Track 1.
Next, select from which PATTERN GROUP (N) you will be choosing Rhythms by pressing the PATTERN GROUP button (N). Only one Pattern Group can be selected for the Track. Re-set the first bar of the Track by pressing the CLEAR/RESET button (F). The CLEAR/RESET button (F) functions as BAR RESET when stopped.
Press the RUN/STOP button (H) and choose the Rhythm Pattern that will
start the Track by pushing one of the SELECTOR Switches (K). You will
hear the Rhythm Pattern begin to play, but it is not yet recorded into
memory. The Rhythm Pattern selected will be recorded into the computer
memory when you press the TAP button (M). This motion writes the Rhythm
Pattern into memory, and advances the memory to the Next bar to be
programmed. The track has now advanced to Bar #2 and the Rhythm Pattern
playing is the Rhythm Pattern which was previously programmed in Bar
#2. To change Bar #2 to another pattern, simply switch to another
Rhythm Pattern and again press the TAP button (M), writing it to
memory.
Chained Rhythm Patterns are selected in the same way as they were
written, by pressing the first and last SELECTOR switches (K) in the
chain simultaneously. All of the Chained Rhythms and memorized as a
group by one press of the TAP button (M).
Continue switching Rhythm Patterns and logging them in memory by
pressing the TAP button (M).
[Be careful when you do this, because if you press pattern 1, tap,
pattern 2, tap, pattern 3, tap, etc really quickly, it'll only record
some of them. The 606 only writes the currently running pattern
into memory when you press tap, not the pattern indicated by the
flashing LED - ed]
At the last bar, choose the last Rhythm Pattern, then press the
CLEAR/RESET button (F) before pressing the TAP button (M). The
CLEAR/RESET button (F) assigns the D.C. bar in the Track memory when
running. Press the TAP button (M), and stop the Rhythm by pressing the
RUN/STOP button(H). Now you have programmed the TRACK.
After pressing the CLEAR/RESET button (F) to re-set tge TRACK to the 1st bar, and start the Rhythm, you can check the program from the first bar of the track by only pressing the TAP button (M). This allows you to manually step through the Track, and if you find a wrong bar, choose the right Rhythm Pattern and press the TAP button (M) to write it into the TRACK memory. When the Rhythm stops the TAP button (M) increments the current bar.
Track Playback
To hear the Track you have just composed, set the MODE Selector (B) to
TRACK PLAY, and press the CLEAR/RESET button (F) which re-sets the
Track to the first bar. Press RUN/STOP (H) and the Track will begin
playing back. Just as you had written it into memory. When the track is
finished, press RUN/STOP (H).
The Pattern group is selected automatically.
Automatic Track Selection
When selecting a Track for a long composition (more than 64 bars), all
that is necessary is to select which Track will be the beginning of the
composition. It is not necessary to switch to the next Track once you
have used up the 64 bars of memory in the first Track. The switching
will be done automatically for you.
The D.S./D.C. Function
The D.S. function is one of the most important functions of the Track
memory of the TR-606, as it allows the Track memory to be used
sparingly. Should you have a song for which you are composing a Track
in which the verses or verse/chorus combination is basically the same,
the D.S. function allows you to repeat the whole segment of the song,
rather than use up more memory by writing the same thing twice.
Fig. 10

|   INTRO   |   VERSE      CHORUS   |   ENDING   |   REST   |
|-----------|-----------------------|------------|----------|
|           |                       |            |          |
START       $                      D.S.                   D.C.
             \______ REPEAT ______/                       STOP
The D.S. function is applied by designating one bar in the Track as the $ (sign) Bar. This $ Bar is the bar that the Track goes to when the TAP button (M) is pressed during TRACK PLAY. The $ Bar is usually the first bar of the verse or chorus that is to be repeated.
Once the Track returns to the $ Bar and repeats the verse, it continues on through the end of the song, unless the TAP button (M) is pressed again. The D.S. function can be activated at any time during Track play, and can be activated by the TAP button (M).
At the end of the song, there is another designated bar, the D.C. Bar. The D.C. Bar should be the last bar in any Track. After the D.C. Bar plays, the Track automatically resets to the first bar of the Track and plays all over again. There can only be one $ Bar and one D.C. Bar for each track.
[I can imagine it's not very easy for a guitarist to stop playing, press tap on the 606 to send it back to the $ bar, then start playing again. If you plan on using your 606 like this, you might want to rewire the tap button so that it goes through a foot switch - that would be a hell of alot easier to quickly press and reset to the $ bar than pressing the "real" tap button - ed]
Setting the $ and D.C. Bars
To set the $ Bar, your TR-606 must be in the TRACK WRITE MODE in
exactly the same status as when you were composing the Rhythm Track.
First, select a Track, reset the Track by pressing the CLEAR/RESET
button (F) and start the Rhythm by pressing the RUN/STOP button (H).
Write a few different Rhythm Patterns into Track Memory, and then press the $ PATTERN GROUP button (N) (which activates the D.S. function) then press the TAP button (M) which will log that pattern into memory. Once the $ button has been pressed, the bar has been designated the $ Bar, and will be the bar the Track will set at when the TAP button (M) is pressed during TRACK PLAY.
Continue programming a few more Rhythm Patterns into memory and then
press the CLEAR/RESET button (F) (which activates the D.C. function)
and then press the TAP button (M). By pressing the CLEAR/RESET button
(F) before pressing the TAP button, the bar you have just played has
been designated the D.C. Bar.
NOTE: Press the CLEAR/RESET (D.C.) button or Pattern Group ($) button
before pressing the TAP button. Otherwise, the bar will be advanced to
the next bar.
To play the Track, press the CLEAR/RESET button (F), and start the Rhythm. When you press the TAP button (M), the Track will jump to the $ Bar after finishing the bar that is playing. At the end of the Track, the bar you set as the D.C. Bar will play once, and then the Track will reset and play all over again from the first bar. To change a bar's designation as $ or D.C. simply recompose the Track and designate another bar as $ or D.C., the original D.S. or D.C. Bar's designation will automatically be erased.
Bar Selection Within the Track
A truly outstanding feature of the TR-606 is the facility to access any
bar within a Track for editing, changing a $/D.C. designation, or just
to listen to a specific passage. This is accomplished by reading the
LED display of the Bar Number, which up till now we have seen, but not
described.
As mentioned earlier, for songs that are longer than 64 bars, these Tracks can be chained up to four Tracks (256 bars). You can select any bar within the chained Tracks and play or compose from the bar you selected.
For example, we will call up Bar #115 in Track 3. Actually the bar #115 is located in Track #4 because the capacity of each track is 64 measures (and in this case tracks #3 and #4 are chained). While the Rhythm is stopped, set the MODE Selector (B) to either TRACK WRITE or TRACK PLAY. Set the TRACK SELECTOR to #3, which is the 1st track of the chained Track. Press the FUNCTION button (J) and hold it down. Press the SELECTOR Switch (K) corresponding to the following Bar designation written below them: #100, then #1, then #5. The LED indicators for #100 and #1 illuminate, and #5 flashes. This indicates that you have set the Track at Bar #115. Release the FUNCTION button and press the RUN/STOP button. Then you can hear the Rhythm from bar #115.
DELETE and INSERT
Stop the Rhythm, set the MODE Selector to TRACK WRITE.
Select the Bar to be deleted or inserted in the same way as described
above.
Release the FUNCTION button once, and press it again.
While holding down the FUNCTION button, press the DEL button. The
selected bar will be deleted.
In the case of insert, press the INS button. This will split the Track
memory at the selected bar and shift all the contents of the rest of
the rhythm track one bar to the right. Now you can change the rhythm in
the selected bar to a new one. Press the RUN/STOP button and select the
new Rhythm Pattern by pressing the SELECTOR switch (K) and press the
TAP button (M).
For example:-
If you mistakenly missed bar 4
e.g. A B C E F G
Then call up the fourth bar using Bar Selection, and press FUNCTION and
INSERT.
e.g. A B C E E F G
Then you can change bar 4 to its correct rhythm.
e.g. A B C D E F G
Displaying the $ and D.C. bars
While the rhythm is stopped, $ and D.C. bars and can be displayed by
the LED indicators. While holding down the FUNCTION button, press the
PATTERN GROUP or CLEAR/RESET button respectively.